Last updated: August 16, 2026
How to render lard comes down to a handful of decisions that matter more than any single recipe step: which fat you start with, whether you add water to the pot, and how carefully you watch the temperature. Get those right and the process is mostly patience.
This guide covers the difference between leaf fat and back fat, wet rendering versus dry rendering, the temperature line between rendering and scorching, and how to strain and store the finished lard.
Quick Answer
How Do You Render Lard at Home?
- Cut the fat into small, even pieces so it melts down evenly and doesn’t scorch in spots before the rest has rendered.
- Cook it low and slow, whether on the stovetop, in the oven, or in a slow cooker, since low heat is what keeps the lard clean-tasting.
- Leaf fat renders into the most neutral, baking-friendly lard; back fat renders into a slightly porkier fat better suited to savory cooking.
- Strain the finished lard while it’s still warm and liquid, then store it in the refrigerator or freezer for the longest shelf life.
Rendering Methods Compared
The basic chemistry is the same no matter which method you choose, melt the fat down and separate it from the connective tissue, but each approach trades off differently on effort and result.
| Method | How it works | Best for |
|---|---|---|
| Dry rendering | Fat is cooked slowly with no added water, direct low heat | Traditional approach, richer flavor, longer shelf life |
| Wet rendering | Fat is cooked with a small amount of water, which evaporates off as it renders | A cleaner, more neutral, whiter lard, well suited to leaf fat |
| Slow cooker or low oven | Very low, indirect heat over several hours, largely hands-off | Avoiding scorching, especially with delicate leaf fat |
Leaf Fat vs. Back Fat: Which Should You Use?
Leaf fat, the fat that surrounds a pig’s kidneys, is considered the highest quality fat for rendering because it has the mildest, most neutral flavor of any cut. That neutrality is exactly why it’s the fat bakers reach for, since it renders into a lard with little to no pork flavor, which works in a pie crust or pastry without competing with the other ingredients.
Back fat, the layer under the skin along a pig’s back, renders into a lard with a noticeably more pronounced pork flavor. That’s not a downside for savory cooking, frying, roasting, or anywhere a little meaty richness is welcome, but it’s a poor substitute for leaf lard in a delicate baked good where a neutral fat is the point.
Wet Rendering vs. Dry Rendering
Dry rendering cooks the cut-up fat directly in a dry pot over low heat, with no water added. It’s the simpler, more traditional method, and it produces a firmer finished lard with a bit more flavor and generally a longer shelf life, since there’s less residual moisture left in the fat to encourage spoilage.
Wet rendering adds a small amount of water to the pot at the start, which helps regulate the heat around the fat and reduces the risk of scorching while it melts down. The water evaporates off as the fat renders, and what’s left tends to be a cleaner, whiter, more neutral lard, which is why it’s a common choice for leaf fat destined for baking. Either method works; the choice mostly comes down to how much you’re prioritizing ease versus a slightly more refined result.
The Temperature Line Between Rendering and Scorching
Rendering fat is a low and slow process, and the biggest risk at any point is letting the heat climb too high. Once the fat and the browning bits of connective tissue in it start to scorch, the whole batch of lard picks up a bitter, burnt taste that no amount of straining fixes afterward.
Keeping It Under Control
A heavy-bottomed pot, whether on the stovetop, in a low oven, or in a slow cooker, distributes heat more evenly and makes scorching far less likely than a thin pan over direct high heat. Stir occasionally, keep the heat low enough that the fat is gently melting rather than sizzling and browning aggressively, and pull the batch off the heat as soon as the cracklings, the solid bits of connective tissue left behind, turn golden rather than letting them go dark brown.
Straining and Storing Rendered Lard
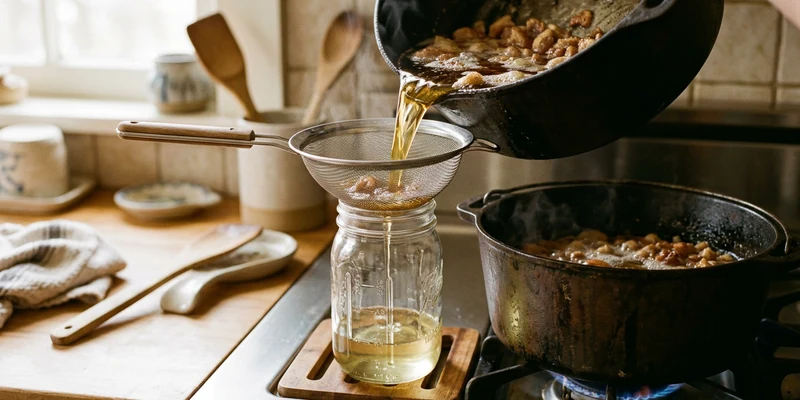
Strain the rendered fat while it’s still warm and fully liquid, pouring it through a fine mesh strainer lined with cheesecloth to catch the cracklings and any small bits of connective tissue. Straining while warm matters because lard firms up and becomes much harder to push through a strainer as it cools.
Once strained and cooled, rendered lard keeps well in the refrigerator for several months and considerably longer in the freezer, stored in an airtight container to keep out air and moisture. Dry-rendered lard, with less residual water content, generally holds up longer than wet-rendered lard, but both benefit from cold storage rather than sitting at room temperature for extended periods.
What to Do With the Cracklings
The solid bits left behind after straining, the cracklings, are a genuine byproduct rather than waste, and plenty of home renderers save them on purpose. Golden, well-drained cracklings make a crunchy, savory snack on their own, salted while still warm, or stirred into cornbread, biscuits, or a pot of beans for texture and pork flavor.
Cracklings that came from a scorched batch of fat are worth tasting before you commit them to a recipe, since the same bitterness that ruins the lard usually carries over into the solids. Store any cracklings you’re keeping in the refrigerator and use them within a few days, since they don’t hold up as well in storage as the strained fat does.
Common Mistakes When Rendering Lard
- Cutting the fat into uneven pieces. Large chunks next to small ones render at different rates, which means some pieces scorch while others are still barely melted.
- Walking away on high heat. Rendering rewards patience over speed; a batch left unattended on high heat can scorch in the time it takes to leave the room and come back.
- Straining after the fat has cooled and firmed up. Cold lard clogs a strainer fast. Strain while it’s still warm and fully liquid.
- Storing lard at room temperature long term. Rendered lard keeps far longer refrigerated or frozen than it does sitting in a cabinet, especially the wetter, wet-rendered kind.
- Mixing leaf fat and back fat without a plan. Combining them isn’t harmful, but it blurs the neutral flavor that makes leaf lard useful for baking, so keep them separate if you want that distinction.
Frequently Asked Questions
How do you render lard at home? Cut the fat into small pieces, cook it low and slow on the stovetop, in the oven, or in a slow cooker, then strain it while warm through cheesecloth and store it cold.
What’s the difference between leaf fat and back fat for lard? Leaf fat, from around the kidneys, renders into a neutral, baking-friendly lard. Back fat, from under the skin along the back, renders into a slightly porkier lard better suited to savory cooking.
Should I use the wet or dry rendering method? Dry rendering is simpler and produces a firmer, longer-lasting lard. Wet rendering, which adds a little water to the pot, produces a cleaner, more neutral lard and reduces the risk of scorching.
What temperature should I render lard at? Keep the heat low throughout. The fat should melt gently rather than sizzle or brown aggressively, since higher heat risks scorching the fat and any connective tissue in it.
How do you know if rendered fat has scorched? Scorched lard picks up a bitter, burnt taste and the cracklings turn dark brown rather than golden. There’s no way to fix a scorched batch afterward, so it’s best avoided by keeping the heat low.
How long does rendered lard last? Several months in the refrigerator and considerably longer in the freezer, provided it’s strained well and stored in an airtight container. Dry-rendered lard generally lasts longer than wet-rendered lard.
The Bottom Line
Rendering lard comes down to starting with the right fat for the job, leaf fat for neutral baking lard, back fat for savory cooking, keeping the heat low throughout to avoid scorching, and straining and storing the finished product cold. Wet or dry rendering both work; the choice is mostly about ease versus a slightly cleaner result.